Epomaker x Aula F99 Manual: A Comprehensive Guide
This manual expertly blends Epomaker and Aula technologies, offering detailed instructions for optimal use, customization, and troubleshooting of your new keyboard.
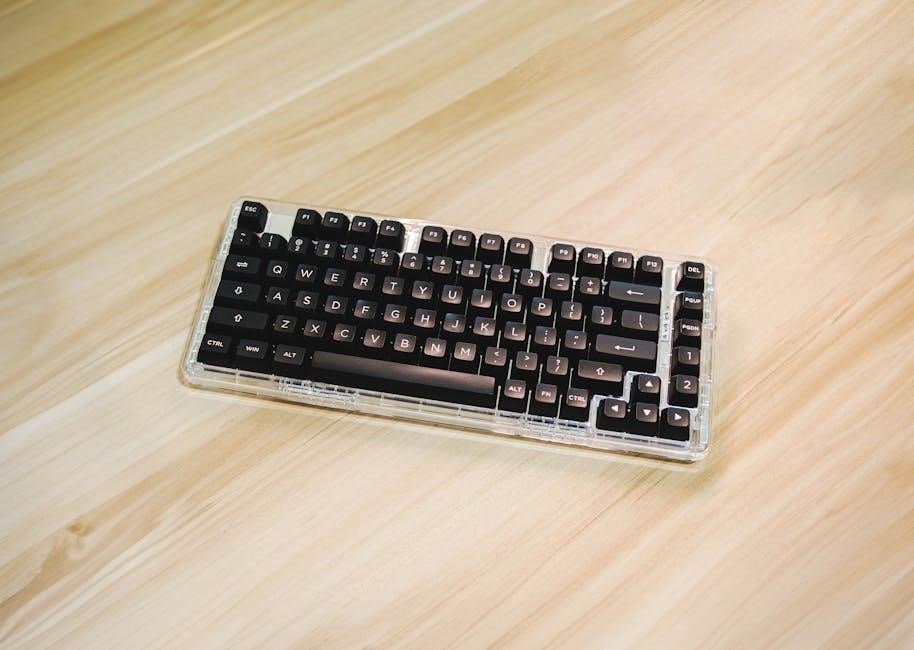
Welcome to the world of enhanced typing experiences with the Epomaker x Aula F99! This keyboard represents a collaborative effort, merging Epomaker’s innovative design principles with Aula’s commitment to quality. It’s built for enthusiasts seeking both comfort and functionality.
Drawing inspiration from models like the Epomaker Split65s, Hack 59, HE75 Mag, and TH108 PRO, the F99 aims to deliver a premium, customizable experience. Expect ergonomic features, a compact layout, magnetic switch compatibility, and intelligent display functionality. This manual will guide you through every aspect of your keyboard, from initial setup to advanced customization. Prepare to unlock the full potential of your Epomaker x Aula F99 and elevate your typing game!
Unboxing and Initial Inspection
Carefully unpack your Epomaker x Aula F99 keyboard and its accessories. Verify the package contents against the included list – typically including the keyboard itself, a USB cable, keycap puller, switch puller (if hot-swappable), and this user manual.
Inspect the keyboard for any visible signs of damage incurred during shipping. Check the chassis, keycaps, and cable for scratches, dents, or loose components. Ensure all keycaps are securely attached and that the switches (if pre-installed) are functioning correctly. If any damage is detected, immediately contact customer support. Retain all packaging materials for potential returns or warranty claims. A thorough initial inspection ensures a smooth setup process!
Key Features and Specifications
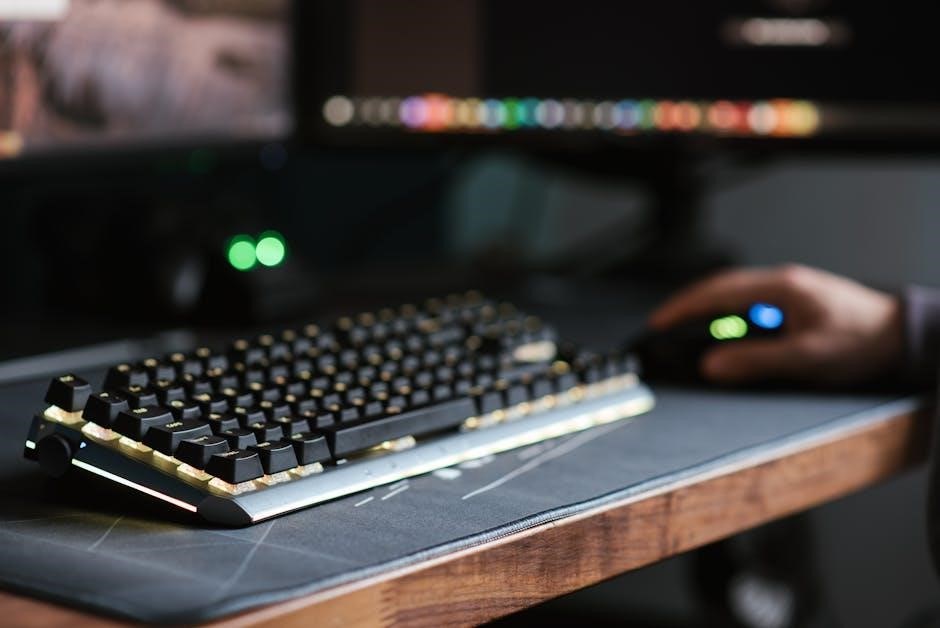
The Epomaker x Aula F99 boasts a compelling feature set. It leverages ergonomic split designs, inspired by the Split65s, for enhanced comfort and reduced strain. The compact 60% layout, reminiscent of the Hack 59, maximizes desk space. Magnetic switch compatibility, like the HE75 Mag, allows for effortless customization and a unique typing feel.
Expect a TKL full function layout, drawing from the Magcore 87, offering comprehensive functionality in a streamlined form. Many models include a smart screen, similar to the TH108 PRO, displaying vital information. Hot-swappable switches enable easy modification, and customizable RGB lighting adds a personal touch. Detailed specifications, including dimensions, weight, and connectivity options, are available on the product packaging and Epomaker’s website.
Ergonomic Design & Split Layout (Based on Epomaker Split65s)
The F99’s ergonomic design prioritizes user comfort, directly inspired by the Epomaker Split65s. This split layout physically separates the keyboard into two halves, promoting a more natural hand and wrist position. This separation minimizes ulnar deviation, a common cause of wrist strain during extended typing sessions. Adjustable angles further enhance personalization, allowing users to find the most comfortable typing posture.
The split design encourages a relaxed shoulder posture, reducing tension in the upper back and neck. This thoughtful design is ideal for programmers, writers, and gamers who spend long hours at their computers. Experience unmatched comfort and improved typing efficiency with this innovative ergonomic approach.
Compact 60% Layout (Based on EPOMAKER Hack 59)
Drawing inspiration from the EPOMAKER Hack 59, the F99 boasts a highly efficient 60% layout. This compact form factor eliminates the number pad and function row, maximizing desk space without sacrificing essential keys. Intelligent design choices ensure a surprisingly complete typing experience despite the reduced size. Functionality is maintained through clever key combinations and layering, accessible via the function key.
Despite its smaller footprint, the F99 doesn’t compromise on usability. The Hack 59’s influence delivers a well-balanced user experience, even with a plastic body. This layout is perfect for minimalist setups and users who prioritize portability and a clean aesthetic. Enjoy a clutter-free workspace and enhanced productivity.
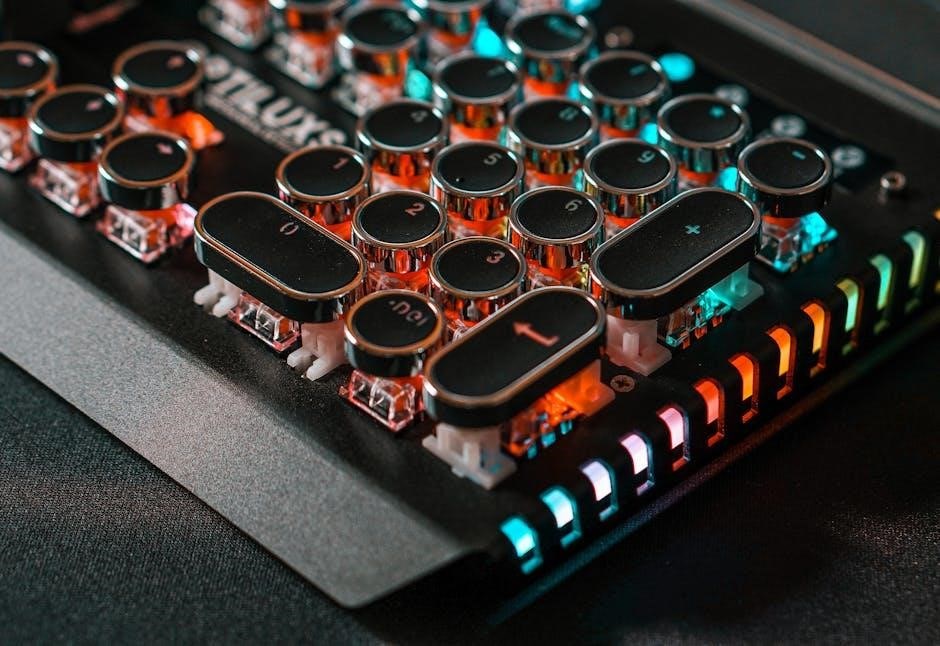
Magnetic Switch Compatibility (Based on Epomaker HE75 Mag)
Leveraging the innovative technology of the Epomaker HE75 Mag, the F99 offers compatibility with magnetic switches. This feature provides a uniquely smooth and consistent typing experience, surpassing traditional mechanical switches in feel and responsiveness. Magnetic switches eliminate the harsh bottoming-out sensation, reducing fatigue during extended use.
The build quality is solid, and the magnetic connection ensures stable and reliable key presses. Enjoy a comfortable and precise typing experience with reduced noise. This compatibility allows for easy switch experimentation and customization, letting you tailor the keyboard’s feel to your exact preferences. Discover a new level of typing comfort and performance.
Setting Up the Keyboard
Before embarking on your typing journey, ensure a seamless setup process for your Epomaker x Aula F99. Begin by carefully inspecting the contents of the box, verifying all components are present. Connect the keyboard to your computer using the provided USB cable – a simple plug-and-play experience for immediate use.
Alternatively, explore the wireless connectivity options (if applicable), following the pairing instructions detailed in the software section. Download and install the dedicated software to unlock the keyboard’s full potential, enabling customization of RGB lighting, key remapping, and macro creation. A properly configured setup guarantees optimal performance and a personalized typing experience.
Connecting via USB
Establishing a wired connection with your Epomaker x Aula F99 is remarkably straightforward. Locate the USB-C port on the keyboard – typically found on the rear panel. Connect the included USB cable securely to both the keyboard and an available USB port on your computer;
Upon connection, your operating system should automatically detect and install the necessary drivers. A successful connection is usually indicated by illuminated RGB lighting or a system notification. If the keyboard isn’t recognized, try a different USB port or restart your computer. This simple USB connection provides a stable and reliable link for immediate use, bypassing the need for complex pairing procedures.
Wireless Connectivity (If Applicable)
If your Epomaker x Aula F99 model supports wireless connectivity, accessing this feature unlocks greater freedom and flexibility. Begin by ensuring the keyboard is charged or has fresh batteries installed. Locate the power switch, typically on the keyboard’s underside, and toggle it to the ‘ON’ position.
Press and hold the designated Bluetooth pairing button – consult the keyboard’s diagram for its precise location. Your computer will then scan for available devices; select “Epomaker x Aula F99” from the list. A successful pairing is confirmed by a visual indicator on the keyboard. Enjoy a clutter-free workspace with reliable wireless performance!
Software Installation and Customization
To unlock the full potential of your Epomaker x Aula F99, dedicated software installation is crucial. Download the latest compatible software from the Epomaker official website, ensuring it aligns with your operating system (Windows or macOS). Follow the on-screen prompts for a seamless installation process.
Once installed, launch the software to access a world of customization options. This includes remapping keys, creating macros for complex commands, and fine-tuning RGB lighting effects. Explore the intuitive interface to personalize your keyboard’s functionality and aesthetics, tailoring it to your unique preferences and workflow. Regular software updates ensure optimal performance.
Customization Options
The Epomaker x Aula F99 offers extensive customization, allowing users to truly personalize their typing experience. Beyond basic key remapping, the software enables the creation of complex macros, streamlining repetitive tasks and boosting productivity. Dive into RGB lighting control, selecting from a spectrum of colors and dynamic effects to match your setup’s aesthetic.
Furthermore, the keyboard’s hot-swappable switch design empowers you to experiment with different switch types – tactile, linear, or clicky – without soldering. Explore Epomaker’s diverse range of mechanical switches to find your perfect feel. This level of adaptability ensures the F99 evolves with your preferences, providing a uniquely tailored keyboard experience.
RGB Lighting Control
The Epomaker x Aula F99 boasts vibrant RGB lighting, fully customizable through the dedicated software. Users can select from a pre-defined palette of stunning colors, or create their own unique hues to perfectly complement their setup. Dynamic effects, such as breathing, wave, and reactive modes, add an extra layer of visual flair.
Control extends to individual key illumination, allowing for customized lighting profiles and accentuation of frequently used keys. Sync the lighting with your music or system events for an immersive experience. The software provides granular control over brightness, speed, and direction of effects, ensuring a personalized and captivating visual display.
Key Remapping and Macros
Unlock the full potential of your Epomaker x Aula F99 with comprehensive key remapping and macro functionality. The intuitive software allows you to redefine any key to perform a different function, tailoring the keyboard to your specific workflow. Create custom macros – sequences of keystrokes – to automate repetitive tasks, boosting productivity in gaming and everyday applications.
Assign complex commands to a single key, simplifying intricate operations. Multiple layers can be programmed, expanding the keyboard’s capabilities exponentially. Save and load custom profiles for different games or applications, ensuring a seamless transition between tasks. This level of customization empowers users to optimize their typing experience.
Switch Replacement (Hot-Swappable Switches)
The Epomaker x Aula F99 features hot-swappable switches, providing unparalleled customization and longevity. Easily replace individual switches without soldering, allowing you to experiment with different feels – tactile, linear, or clicky – to find your perfect typing experience. This feature extends the keyboard’s lifespan, as worn or damaged switches can be quickly and affordably replaced.
Compatible with a wide range of mechanical switches, the F99 empowers you to personalize your keyboard’s performance. A switch puller is often included, simplifying the removal process. Ensure compatibility with the keyboard’s socket type before purchasing replacement switches. Enjoy a constantly evolving keyboard tailored to your preferences!
Troubleshooting Common Issues
Encountering issues with your Epomaker x Aula F99? This section addresses frequent problems. If the keyboard isn’t detecting, check the USB connection and ensure drivers are correctly installed. Key issues, like unresponsive keys, may stem from loose connections or switch problems – try reseating the keycap or replacing the switch if hot-swappable.
Software conflicts can also cause malfunctions; close unnecessary background applications. Regularly updating the keyboard’s firmware and software is crucial for optimal performance. If problems persist, consult the Epomaker support resources or Aula’s documentation for further assistance. A systematic approach to troubleshooting will quickly resolve most issues.

Keyboard Not Detecting
If your Epomaker x Aula F99 isn’t recognized by your computer, begin with the basics. Ensure the USB cable is securely connected to both the keyboard and a functioning USB port. Try a different USB port, preferably a USB 2.0 port, to rule out compatibility issues. Verify that the keyboard is powered on, if it has a power switch.
Next, check Device Manager (Windows) or System Information (macOS) to see if the keyboard appears with any error flags. Reinstalling the keyboard drivers can often resolve detection problems. A faulty USB cable can also be the culprit; test with a known working cable. Finally, ensure your operating system is up-to-date.

Key Issues and Fixes
Experiencing unresponsive or stuck keys on your Epomaker x Aula F99? First, thoroughly clean the keycaps and surrounding area, as debris can cause malfunctions. If a key consistently fails, and the keyboard is hot-swappable, try replacing the switch. Ensure the new switch is fully seated in the socket.
For stabilizer issues causing rattling or uneven key presses, carefully re-lubricate the stabilizers with a suitable keyboard lubricant. Check software settings for accidental key remapping or macro conflicts. If problems persist, a factory reset via the configuration software might resolve underlying software glitches. Remember to back up your profiles first!
Software Conflicts
Occasionally, the Epomaker x Aula F99’s configuration software may conflict with other applications on your system. This is often seen with other peripheral control programs or macro utilities. Close any potentially conflicting software before launching the Epomaker software to ensure smooth operation.

Antivirus programs can sometimes interfere with driver installation or software functionality; temporarily disabling your antivirus during setup might be necessary, remembering to re-enable it afterward. If conflicts persist, try running the Epomaker software in compatibility mode for an older version of Windows. Regularly updating both the keyboard firmware and the configuration software can also mitigate compatibility issues.
Maintenance and Care
To ensure the longevity of your Epomaker x Aula F99 keyboard, regular maintenance is crucial. Avoid exposing the keyboard to liquids or extreme temperatures. Dust accumulation can affect key responsiveness, so periodic cleaning is recommended. Use a soft, dry cloth to wipe down the keycaps and chassis.
For stubborn dirt, slightly dampen the cloth with isopropyl alcohol, ensuring it’s not dripping wet. Never spray liquids directly onto the keyboard. Store the keyboard in a clean, dry place when not in use, protected from direct sunlight. Proper care will maintain its performance and aesthetic appeal for years to come.
Cleaning the Keyboard

Maintaining a clean Epomaker x Aula F99 keyboard is essential for optimal performance and hygiene. Begin by disconnecting the keyboard from your computer. Use a keycap puller (if available) to remove keycaps for thorough cleaning – this isn’t always necessary for routine upkeep. Gently shake the keyboard upside down to dislodge loose debris.
Employ a soft brush or compressed air to remove dust from between the keys and within the chassis. For surface cleaning, lightly dampen a microfiber cloth with isopropyl alcohol (ensure it’s not dripping wet!) and wipe down the keycaps and frame. Allow everything to dry completely before reassembling and reconnecting.
Storage Recommendations
Proper storage extends the lifespan of your Epomaker x Aula F99 keyboard, protecting it from damage and dust accumulation. When not in use, ideally store the keyboard in a cool, dry environment, away from direct sunlight and extreme temperatures. Consider using a dust cover to shield it from particles.
If storing for an extended period, remove the USB cable and, if possible, the keycaps to allow for better ventilation and prevent potential sticking. Avoid placing heavy objects on top of the keyboard, as this could damage the switches or the frame. A dedicated keyboard bag or box offers optimal protection during transport or long-term storage.
Warranty Information & Support
Your Epomaker x Aula F99 keyboard is covered by a standard one-year warranty against manufacturing defects. This warranty covers issues like faulty switches, PCB malfunctions, or defects in materials. It does not cover damage resulting from misuse, accidental damage, or unauthorized modifications.
For warranty claims or technical support, please visit the official Epomaker website and navigate to their support section. You’ll find FAQs, troubleshooting guides, and contact information for their customer service team. Retain your proof of purchase for warranty validation. Epomaker’s online store also offers a wealth of accessories and upgrades to enhance your typing experience.
Aula F99 Specific Features (Based on Aula F99 Manual)
The Aula F99 distinguishes itself with a TKL (Tenkeyless) full function layout, mirroring designs like the Magcore 87. This provides a compact form factor without sacrificing essential keys, enhancing desk space efficiency. Expect a robust build quality and a focus on practical functionality. The keyboard aims to deliver a balanced experience for both gaming and everyday typing tasks.
Further enhancing usability, the Aula F99 incorporates display functionality, inspired by the TH108 PRO. This integrated screen provides vital information and allows for personalized customization, adding a modern aesthetic and improved user control. Explore the full potential of this feature for a truly tailored experience.
TKL Full Function Layout (Based on Magcore 87)
The Aula F99 embraces a Tenkeyless (TKL) layout, a design philosophy popularized by keyboards like the Magcore 87. This intelligent configuration strategically removes the number pad, resulting in a more compact and ergonomic footprint. This design choice maximizes available desk space, benefiting users who prioritize mouse movement and streamlined setups.
Despite the reduction in size, the F99 retains full functionality, ensuring no compromise on essential keys for gaming, typing, or productivity. The TKL layout offers a balanced approach, providing a comfortable and efficient typing experience without unnecessary bulk. It’s a practical solution for users seeking a responsive and space-saving keyboard.
Display Functionality (Based on TH108 PRO)
Drawing inspiration from the EPOMAKER TH108 PRO, the Aula F99 incorporates a sophisticated smart screen to elevate user interaction. This integrated display isn’t merely aesthetic; it delivers vital system information directly at your fingertips, enhancing workflow and providing real-time feedback.
Users can customize the display to showcase personalized flair, including animated GIFs, system monitoring data, or keyboard profiles. The screen’s functionality extends beyond simple visuals, offering quick access to controls and settings. This powerful feature transforms the keyboard into a central hub for information and customization, mirroring the TH108 PRO’s advanced capabilities.